Tuesday, May 31, 2011

On a Gardening Vacation-How to Photograph Children and Pets

This past memorial day weekend we started putting in our garden in our backyard.  Unfortunately I vastly underestimated how much time it would take to dig up all the sod and then plant.  I'm still in the digging phase and it takes quite a while, especially when I have to sing the "Wheels on the Bus" while getting covered in soil.  Any apologies for the lack of crafting going on, but Colby and I did a quick photo shoot.  I've discovered a few things about photographing children and pets (Hopefully I didn't offend anyone by lumping your child in with your dog):
1.  Get down at their level.  No one wants a far a way shot looking down on a child or for that matter a shot looking up their nose. 

2.  Don't use the flash.  This freaks babies out and you end up with a picture with a kid with a really confused look. 

3.  Experiment with different colorings.  My camera has a color swap which makes all the greens pop but everything else is black and white. Okay, this isn't the best example of the colors popping, but it makes Martin look pretty awesome.

4.  Play with different backgrounds.  I like to use blankets with visual interest but photographing in the great outdoors is always a good move.


5.  Capture some action or emotion.  If the photos look to posed and stiff they won't elicit a reaction from your audience.
6.  Edit your pictures.  Crop, reduce red eyes, and play with the exposure, contrast, and highlights.
7.  Make sure your subject is rested and happy or you'll end up with a crying baby picture and look like a bad parent.

Friday, May 27, 2011

How to Make Storage Boxes

As I mentioned earlier we went to IKEA and purchased a large entertainment center which had cubbies that needed baskets.  I went to Target to try and find some big baskets that would fit, but there weren't any that were big enough, and I'm not willing to run out to IKEA just yet as I'm still in a bit of a shock.  I then set out to make some customized baskets/boxes that would also add some color and pizazz.  I didn't have to buy anything so these boxes were virtually free.  Here's the final product:
What you need:
  • Cardboard
  • Wide Tape
  • Exacto Knife
  • Measuring device or square
  • Fabric for inside and out
  • Thread
  • Needle
  • Sewing Machine
Step 1:  Measure how big you want your box to be and cut out sizes from cardboard.

Step 2:  Tape the card board together to the base and use as a pattern to cut out the fabric. I added about 1/2 an inch for my seam allowance.  Cut out the inside and outside fabric for the box.

Step 3:  Sew edges of fabric together to form the shape of a box.  Then tape together box and put fabric on.  At this point I noted if I needed to make the fabric more snug to the box and took in the seams.  (To do this put the fabric on the box inside out and then pin the seams and take off and sew)


Step 4:  Place both the inside and outer fabrics on box.  Pin the tops together but leave one side open so you can remove the fabric from the box and sew with machine. 


Step 5:  Once you have sewn the two pieces together place back on box right side out.  Using clips I held the fabric where I wanted it and used an invisible stitch and sewed the last seam. 


 Now you have a great fabric box.  I'm planning on using some modge podge to make the inside of my box a bit sturdier.  On the next box I am making I used a double layer of cardboard to make it more sturdy. 

Thursday, May 26, 2011

Touching Moment


When I was going on being a week overdue I got a letter from my mom with this picture of me and my grandma in it and a thank you note that my mom had written to my aunt about the first week she had brought me home.  My grandma passed away when I was in elementary school so it took me back to the days when I'd see my Grammy and I would run up to her and get a great big bear hug.  Needless to say with my emotions running high from my pregnancy I broke into tears realizing how lucky my child will be to have a Grammy that loves him just as much as I am loved.  In the thank you note my mom mentions how my older brother and sister reacted to my coming in.  It made me chuckle. Now here's a picture of my Mom holding Colby for the first time.  So sweet.

Tuesday, May 24, 2011

How to Hide Your TV

Now that we have a gigantic entertainment center and humongous TV, I would like to try to make it not such a prominent feature of the room.  If I had lots of money-feel free to send donations-I would get a framed mirror that fits over the TV that looks like a mirror until you turn it on and then you can see the TV.  Here's a picture of a model when Oprah had them on her show.  Candice Olson has also utilized them on Divine Design. 
Images came from Hiddentelevision.com
Since I can't afford $300+ dollars on a TV mirror I'll have to settle with other design tactics.  The best idea that I can come up with is to use some really big framed art behind the TV so your eye isn't automatically drawn to the big black box. 

From Coastal Living              
Not entirely art, but very distracting from TV
apartmentinteriordesign.org

Another way to hide my television could be to build the shelves up and around the television.  I somehow don't think my husband would like to give up another weekend assembling IKEA furniture though, bummer.
Divine Design

Monday, May 23, 2011

IKEA, Oh My


This weekend I made my first venture to IKEA.  My husband, Colby (4 months), and I made the venture on Saturday because it was rainy and rather miserable.  I toted Colby around in a front carrier, and thank God, I can't imagine how crappy our trip would've been with a stroller or cart to push.  It was a mad house.  There were just gobs of people everywhere.  We went to IKEA with the idea to buy an entertainment stand since we just got a new recliner and wanted to "finish" off the room furniture wise.  We had been using a stand we painstakingly agreed upon from Target five years ago. (See picture, see very little storage)

After a long adventure through the maze of the show room and then endless cavern of the warehouse and over fifteen minutes in line we made it out with our new TV stand.  Well, sort of, once we got home we decided that instead of some doors here we'd like to put drawers in instead so my husband ran back out to IKEA for the new configuration.  Then after hours and hours of assembly-everything comes completely un assembled-and dozens of card board boxes later-we have our new entertainment center.  Now I just need to find some baskets and decor for on and around it.  Oh the consumerism never ends.  Oh I forgot to mention the worst part, about midnight Colby woke up crying hysterically and I couldn't console him for about an hour, I think he was having nightmares of giant warehouses, mobs of people, and ceiling fans as big as our house (when you go to IKEA next time look up and you will see what I'm talking about). 


Friday, May 20, 2011

Baptism Outfit

Here are the official pictures of Colby in his hand sewn outfit, pretty handsome little man.
 He also got baptized with his cousin who is a month younger than he is.  What a day!
He fell asleep during church and he slept through everything. The cold water being dumped on his head and walking around the church didn't phase him at all.  What  a trooper.  

Thursday, May 19, 2011

Grilled Eggplant

As Summer is approaching we have started to grill more.  My husband and I are also trying to eat healthier and trim down.  I believe I heard somewhere that eggplant is a super food-so I picked one up at the grocery store with no idea of how to make it.  The only way I had made eggplant before is in eggplant Parmesan where it is coated in egg, bread crumbs, and topped with pizza sauce and cheese.  I got the basis for this recipe from allrecipes.com.  I found the eggplant to be quite delicious although my husband refused to try them.  Enjoy!


Ingredients:
1 eggplant
3 Tbsp Olive Oil
2 Tbsp vinegar (balsamic or apple cider)
1/2 Tbsp Italian Seasoning
Dash or Salt and pepper
2-3 Cloves of Pressed Garlic

Directions:
1.  In a medium sized bowl or shallow pan whisk together all ingredients except eggplant.
2.  Peel eggplant. (a normal potato peeler won't work so I just use a sharp knife)
3.  Cut into slices about 1/2 inch thick.  (My eggplant yielded about a dozen discs)
4.  Dip eggplant discs into mixture then place on medium grill for about 6 minutes on each side.  Take off grill.
5.  Enjoy.

Wednesday, May 18, 2011

First Freezer Stencil Attmept Golf Bag Shirt

Once again I've been on the baby clothes making kick. I've been saving old clothing items from t-shirts to boxer shorts so I'm trying to make my fabric stash smaller.  Looking around at other blogs there are tons of clothes creations for girls but rarely are there fun little outfits for boys.  I made a pair of pants and then attempted to make a fabric applique and then stencil over it.  I learned that it is best to stencil and then add the fabric applique over it.  I also learned to take the freezer paper off right away or it sticks to the fabric and it is impossible to get off.  I had to try and use water to get the paper off and then I ended up washing the shirt before the paint was completely dry so I could finish it that day.  Oh the frustrations.  The final product looks pretty cute though.  I'm looking forward to trying another stencil soon. 

This is the design idea I started with for the t-shirt:


Tuesday, May 17, 2011

Freezer Paper Stencils

Occasionally I spend a few hours checking out some of my favorite blogs looking for fun inexpensive craft and gift ideas.  I ran across this idea of making your own stencils and decorating t-shirts, bags, pillows, and everything you could think of.  First off Freezer paper is similar to wax paper but it has a waxy plasticy substance just on one side.  Basically you cut out your design out of the freezer paper, iron onto your fabric waxy side down.  It will stick to your fabric so you can then paint recklessly over the cut out parts.  You then remove the paper and magically you have an awesome looking design.  If you visit here you can see a tutorial specifically of how to do this project. Here are some examples of what freezer paper stenciled items can look like:
artfulparent.wordpress.com
I really love the birdy look.  I think this will be one of the first designs I try out-Maybe on some printed pillows.  I'm excited.

chrysanthemum.typepad.com
I'm thinking my nephews and niece are going to have tons of personalized items, perhaps I should try to limit the amount though so strangers don't try to abduct them since they'll know their names.  Hmm.

  
stitchcraftcreations.com

I'm loving the two tone stencil.  These stencils will take a bit more time and work, but the end product is definitely worth it.  I've bought a pack of five plain t-shirts for my nephews and I"m thinking little giraffe shirts would be awesome.  I really think the possibilities are endless at what can be created and I like having the option of adding some special touches to gifts.  The freezer paper is about five dollars for a gigantic roll and I've got tons of fabric paint hanging around so it makes for a really inexpensive project. 

bellgirl.com  

Monday, May 16, 2011

Homemade Baptism Outfit

Last weekend we finally got Colby baptized-he's 3 months-but with the Easter holiday and our in laws away for the winter our choices were limited.  I looked and looked and looked for a baptism outfit but had a hard time finding anything white in the baby section.  Apparently white isn't a good color for little ones.  Instead of going out and buying an expensive outfit online I decided to try my hand at sewing one.  I bought about 9 dollars in fabric-with quite a bit remaining-and used some of his pants and shirts as patterns.  I made a shirt, pants, and a little vest for him to wear.  I went through a lot of trial and error on this outfit.  The first vest I made turned out wonderfully, but it was probably about two sizes too small so it will now be a doll outfit.  The pants were kind of tricky because I needed extra room for the diaper so I had to add an extra piece of fabric in the crotch area.  One of the hardest things I discovered were hems and cuffs.  working with such small pieces of fabric is nearly impossible and I managed to sew the leg openings shut a few times.  All and all it looks pretty good.  Once I get some of the actual pictures from the baptism day I'll post those as well. 


Monday, May 9, 2011

Yo-yo Inspirational Ideas

It seems that the yo-yos are our only mastered "flower" so far, so I thought I could come up with some fun ideas of what to do with these fabulous little delicacies.  I was orginally inspired by an Ethan Allen picture of a blanket that was completely made up of yo-yos in different shades of white.  Awesome.


If you are unsure of how to make yo-yos there is a great tutorial here from Zakka Life.  Apparently there are also yo-yo makers out there, but I would completely see that as cheating.  If there is such a thing as cheating in crafting, I suppose it would just be more of a short cut.  Any who, back to some inspirational projects.


I'm not really sure if this would be all that comfortable, but it is pretty cool to look at.  Guess it is a good way to try to make some money off scraps of fabric at 45 dollars a pop.  Go here to find it.  Now that I've gotten my fanciful ideas out here, let's look at some more stylish functional options. 


I love the color combinations on this pillow.  I've been meaning to update my couch pillows for quite some time and this may be a fun way to do it.  I just need to find some fun fabric.  
This Pillow comes from Sew Mama Sew and there is a tutorial here also. 


Here's another awesome idea that wouldn't be too time intensive but it would be very high impact.  The tutorial is here for the tank and t here are also some other fun sewing ideas at Stitch in My Side.  You can visit this link here to find out more info.


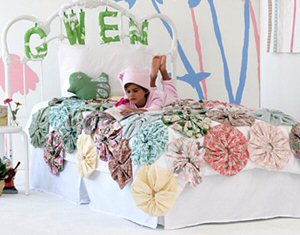
 Gwen would have this ugly yo-yo blanket. (Sorry Gwen)


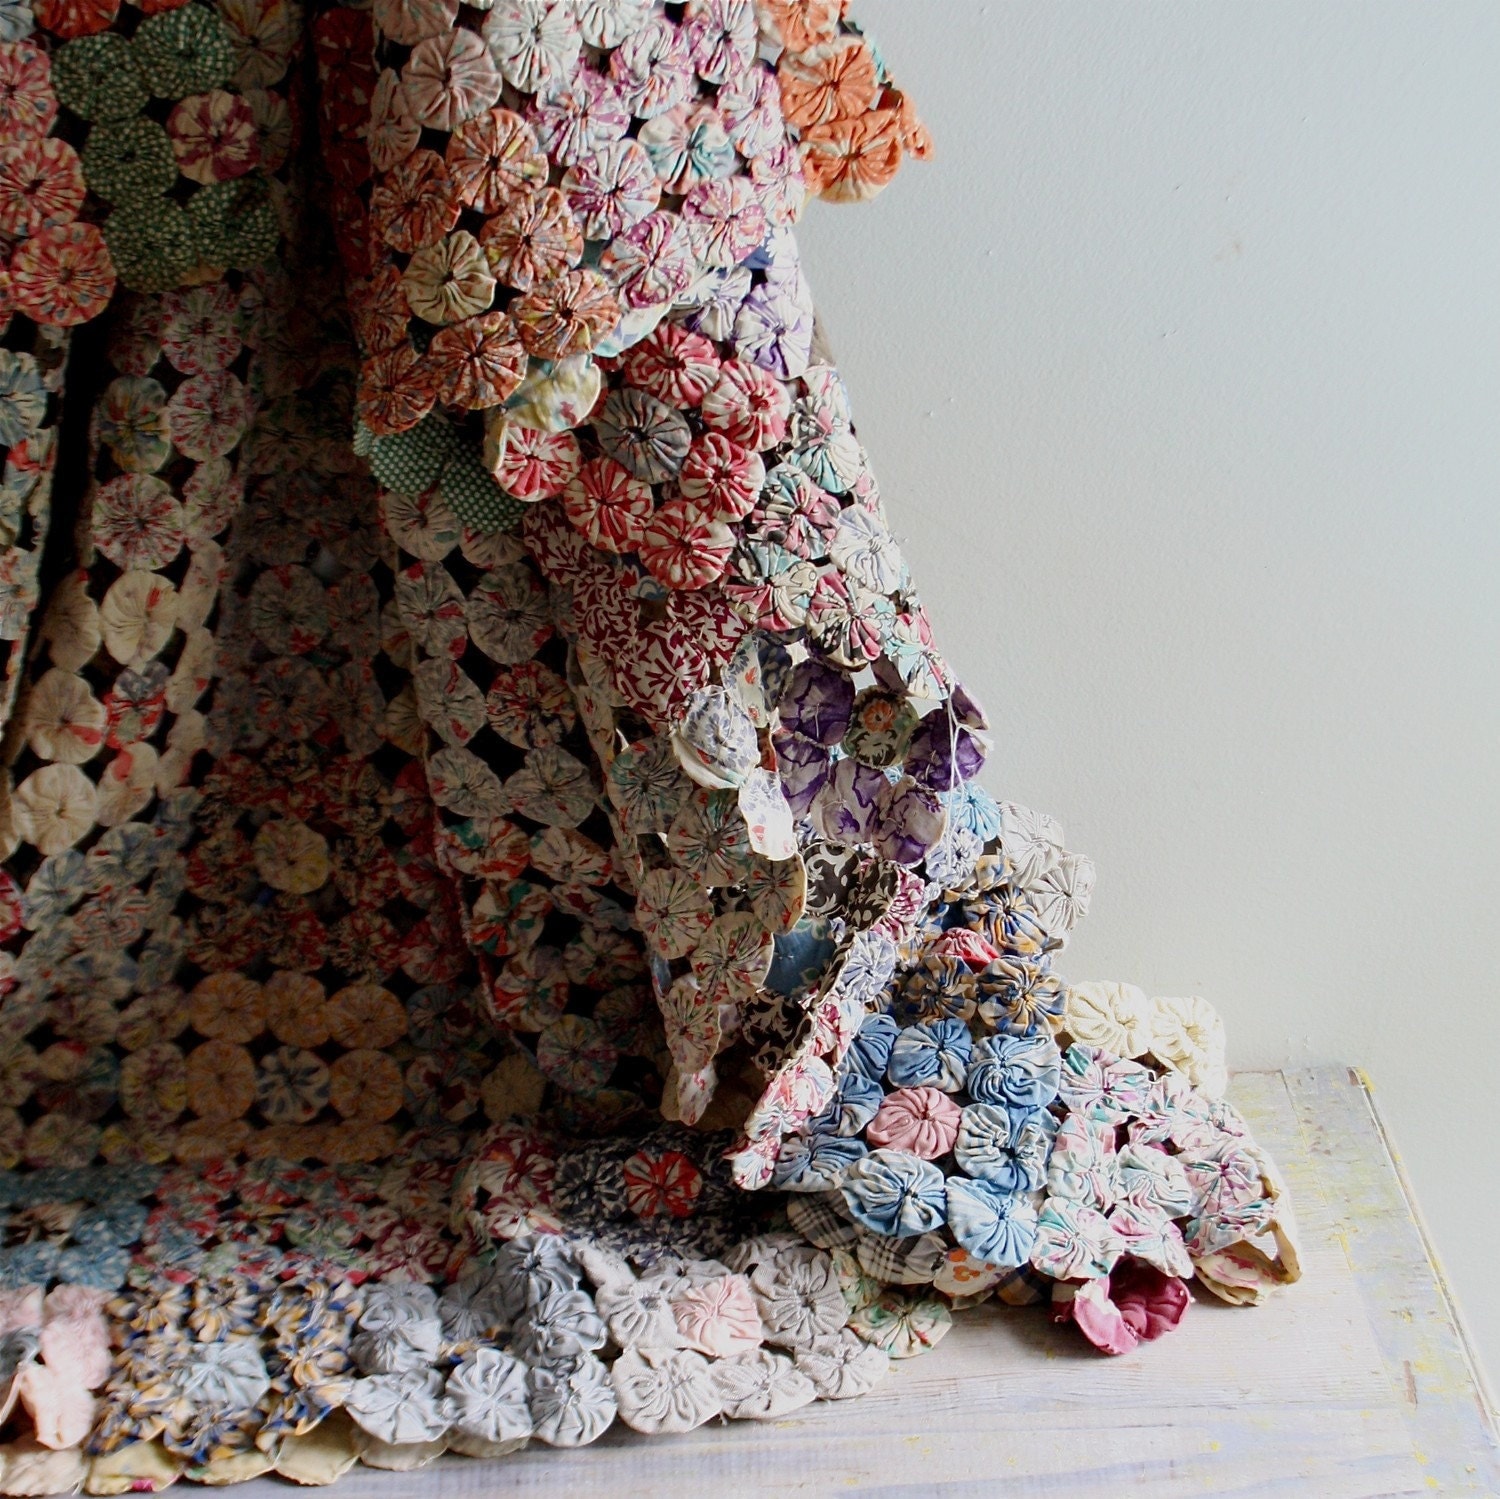
This one is awesome!  Apparently it is an antique yo-yo blanket.  A crazy amount of time must have gone into this, but this would be a great activity to do while watching TV.  Go here to find out more info. 


This is what it looks like when yo-yos go bad.  You can go here to find this one.