Tuesday, November 23, 2010

Divine Sweet Saltines


I'm eating one of these delicious snacks as I'm typing. I got this recipe from my mom a few years ago and I haven't found an easier or tastier treat to share with family over the holidays and with only 4 ingredients it is hard to mess up. They may not be the prettiest, but all who try one will be pleasantly surprised.


Ingredients:
40 Saltine Crackers (one tube of crackers + 10 or so)
2 Sticks of butter
1 Cup of Brown Sugar
1 1/3 Cups of Chocolate Chips (I mix in white chocolate chips too)

Directions:
1. Preheat oven to 425 degrees.
2. Butter up heavily or line a large cookie sheet with foil. I've had problems with the foil sticking before so I usually opt for lots of butter on the pan. Spread crackers out in single layer on cookie sheet.
3. In saucepan melt butter and sugar then boil for 5 minutes. Pour mixture over crackers and place in oven for 5 minutes or until bubbly.
4. Top with Chocolate chips and wait a few minutes for them to warm up then spread them with a spoon. Place in freezer or outside if you live in the Midwest in the winter time. Break into pieces and store in a cool spot.
5. Try not to eat the whole batch before you deliver them.

Saturday, November 13, 2010

Quote of the Day

"She wasn't where she had been. She wasn't where she was going…but she was on her way."
- Jodi Hill

Friday, November 12, 2010

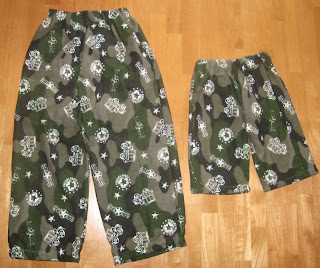
Christmas Present Idea* Little Comfy Pants


I think JoAnns will be the downfall of our checking account. Last time I was there I found this camouflage flannel for $2.99 a yard. Two of my nephews ages 4 and 1 have their dad serving over in the Middle East for a second tour with the army so I thought they would enjoy having Army-esque pants. Last time I was visiting them I simply traced a pair of their pants onto newspaper for a pattern. The little pants seemed out of proportion with a really long waist band, so I dropped the waist, only to realize later that he would need a longer waist to accommodate his bulky diaper. They may end up being low risers for him-so trendy:)

Price: $7.00 for fabric and elastic
Time: 30 minutes

Thursday, November 11, 2010

Baby Swing Renovation


I got an older baby swing from my sister and washed the cover, unfortunately, the cover shrank so I decided to give a hand at making a more colorful cushion. Hopefully the baby will love it just as much as I do. It is much more colorful and fluffy than the original. I'm still working on perfecting the restraint system (buckles).

Friday, November 5, 2010

Newest Purse

Here is my newest project! I have been meaning to sew for quite some time now. It just so happened that I got up the other morning at 6 and couldn't sleep so I decided to start this project. For my first attempt I'm pretty excited, but there are still some kinks I need to work out. My favorite part of the purse is the giraffe lining. I ended up jazzing up the purse a bit with some accessories!


Homemade Dog Bones


When the time comes for Christmas gift giving, I have a hard time. One of my favorite gifts to give are these dog bones. The first time I gave the bones I put the bones in personalized containers. I used old oatmeal and hot chocolate cardboard tube containers. I made labels and included the cutest picture of my dog ever. My dog generally turns her nose up at store bought biscuits, but she gobbles these right up.

Cheesy Peanut Butter Dog Bones
1 cup of Oatmeal
1/4 cup of Margarine/butter
1.5 cups of hot water
1 cup of shredded cheese
1 beaten egg
1 cup of cornmeal
1 cup of wheat germ
3 cups of flour (white or wheat)
1 cup of peanut butter (creamy or chunky)

Directions:
1. In a large bowl pour hot water over oatmeal and margarine. Let stand 5 minutes.
2. Stir in peanut butter, cheese, egg, cornmeal, and wheat germ.
3. Add flour.
4. Knead by hand for 3-4 minutes.
5. Roll dough to 1/2 inch thick and cut into dog bone shapes, sticks, or use cookie cutter.
6. Place on greased cookie sheet and place in oven at 300 degrees for 30-45 minutes until golden brown.
7. Turn off oven, but leave bones in oven to continue baking. Cool and place in container.
8. Store bones in cool place or refrigerator.