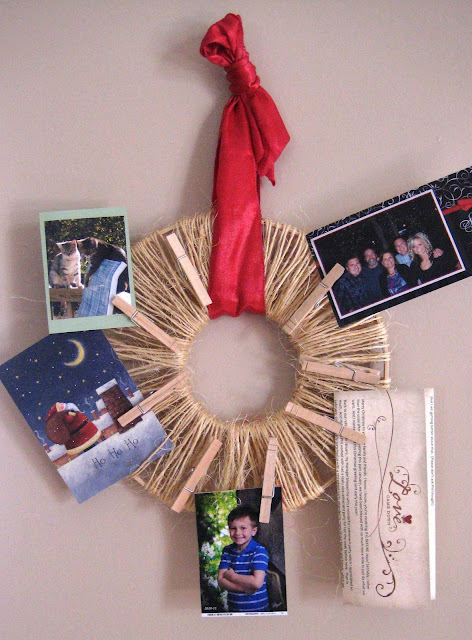
Well, I realize it's a bit late, but I made another card wreath to hold all of our lovely Christmas cards from our friends. This time I decided to make it a bit heftier with some burlap and ribbon. I used two embroiderly hoops of different sizes and simply tied on strips of burlap and ribbon. The clothespins just wiggle in between the pieces so they aren't glued on or fastened in anyway which makes it more versatile to fit whatever size of cards you receive. Now that I have them all done I imagine the clothespins could be placed on the back of the wreath so they would be hidden even more-oh the possibilities. Happy Crafting!
Showing posts with label Christmas Gift Idea. Show all posts
Showing posts with label Christmas Gift Idea. Show all posts
Monday, January 9, 2012
DIY Card Wreath
Well, I realize it's a bit late, but I made another card wreath to hold all of our lovely Christmas cards from our friends. This time I decided to make it a bit heftier with some burlap and ribbon. I used two embroiderly hoops of different sizes and simply tied on strips of burlap and ribbon. The clothespins just wiggle in between the pieces so they aren't glued on or fastened in anyway which makes it more versatile to fit whatever size of cards you receive. Now that I have them all done I imagine the clothespins could be placed on the back of the wreath so they would be hidden even more-oh the possibilities. Happy Crafting!
Wednesday, December 21, 2011
Mittens Made from Sweaters
 |
| Pic from Mossymossy.com and tutorial can be found here. |
Monday, December 12, 2011
DIY Card Wreath
I finally got around to making a wreath, I've had the components for a few weeks now so I'm relieved to have it finally done and crossed off my list. Originally I was just going to make the wreath with one embroidery hoop but I thought it looked to skimpy and thin so I decided to add in a smaller hoop to make it actually look like a wreath. I also had a terrible time with the bow, at first I tried to tie a regular bow with two big loops, but after searching google for tips and untying and tying it numerous times this is what I ended up with. It was quite simple to make.
1. Get two hoops of varying sizes.
2. Using twine tie it to the top of the big hoop then weave it in and out of the little hoop. The first wrap the twine was really spread out, just so I could get the little hoop positioned in the center.
3. Continue around the hoops filling in the gaps until it looks pleasing to your eye.
4. Tye a bow, or at least try to.
5. Place clothespins in the twine. I didn't use glue I just kind of got the clothespins tangled up so they can be repositioned depending on how many pictures/cards I have.
6. Enjoy.
Friday, December 9, 2011
Homemade Gift Ideas for Babies
It seems now that I have a little one and I have 4 nephews and nieces I find myself drawn to the little handmade things. I finally got a niece last March so I'm looking forward to trying my hand at frilly skirts and dresses.
 |
| One thing that I don't leave the home without is my diaper pack in my
purse. Unfortunately I just have an ugly Pampers one I got for free,
so I'm looking forward to trying this one out. Tutorial Here |
 |
| Colby tends to make a mess at every meal so I can imagine new parents
would love some of these large 'baprons' these are a hybrid of an apron
and a bib. The fabric choices could be endless and I look forward to
gifting some of these. Tutorial Here |
 |
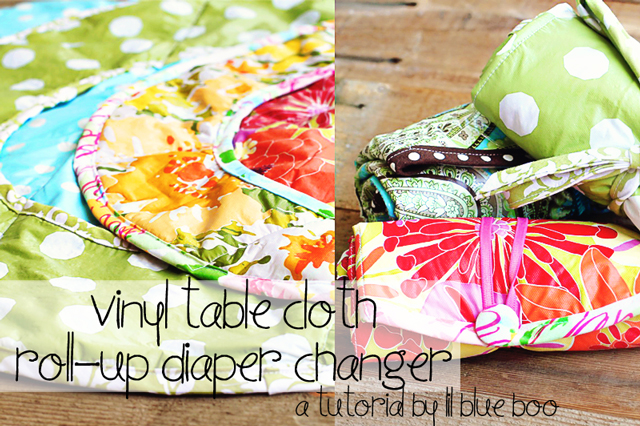
| Another necesity I have found when we are out and about is a changing
pad. Those fold down changing tables frighten me and I can't imagine
how many germs are floating on its tan textured plastic, ick. Tutorial Here |
 |
| For the older toddlers some bathtub crayons would be a blast. I tend to
think that the time in the warm sudsy water is one of Colby's favorite
time of day.Tutorial Here |
 |
| Good old Martha, she's always got such great ideas, or at least her
staff does. What little kid couldn't use another stuffed animal. I
love the ears and contrasting fabric. Tutorial Here |
Thursday, December 8, 2011
Gifts for the Sewer
I always have a hard time buying presents for my family because I tend to be more on the practical side: sure those slipper are pretty, but they've got three pairs they don't wear, so it makes it very difficult to gift. Many of the ladies are also very big on sewing and crafting so I've run across a few good ideas for gifting.
This one is not only pretty, but practical as well since you can store buttons and odds and ends down below. (free)
I just got this book from my good friend and I love it! There are so many great patterns and bag ideas. It explains how to make pockets, do lining, and everything else. I'm excited to start my bag making. ($17.00)
This BurdaStyle book looks great and looks like it has some great ideas on clothes making. I'm sure it would just add to my long list of projects to do, but I'm willing to sacrifice that to have the book. (20.00)
These sewing sissors would be great for the sewer just starting out. My mom gave me a pair shortly after graduating college and I love them. They make cutting fabric a breeze, and they look really scary so you can defend yourself if you ever get burglarized while you are sewing. ($27.00)
 |
| Tutorial Here |
This one is not only pretty, but practical as well since you can store buttons and odds and ends down below. (free)
 | |
| Amazon.com |
I just got this book from my good friend and I love it! There are so many great patterns and bag ideas. It explains how to make pockets, do lining, and everything else. I'm excited to start my bag making. ($17.00)
 |
| amazon.com |
This BurdaStyle book looks great and looks like it has some great ideas on clothes making. I'm sure it would just add to my long list of projects to do, but I'm willing to sacrifice that to have the book. (20.00)
 |
| Find them Here (best for the beginner sewer) |
These sewing sissors would be great for the sewer just starting out. My mom gave me a pair shortly after graduating college and I love them. They make cutting fabric a breeze, and they look really scary so you can defend yourself if you ever get burglarized while you are sewing. ($27.00)
Wednesday, December 7, 2011
Gift Ideas for the Women in Your Life
Year after year our family has slowly moved away from spending money on Christmas gifts. Usually we just buy or make something small for each family. Last year we just got board games for my siblings' families. This year I'm still torn on what to make but the females in my family always seem to be running cold so I think some hand warmers and tissue holders would be welcome. For Something pretty I really want to try making a beautiful bracelet as well. Once again, a million projects but nothing made yet, looks like I need to spend less time acquiring ideas from Pinterest and just make what I've got already. So many ideas, so little time.
 |
| Here's the Tutorial |
 |
| Example Comes from Here |
 |
| Tutorial Here |
Tuesday, December 6, 2011
DIY Christmas Wreaths
Well, I have been in such a creative funk lately. I think with the snow storms I have this urge to just wrap myself in a blanket and throw in a movie, but alas, with a ten month old that only happens after eight o'clock, so I have been spending my time chasing him around and preventing him from eating cords, dog food, and leaves. What fun! I have so many project ideas to do and I just need to start the sewing machine up. For now though, I'll just add to my long list of projects to do.
 |
| Tutorial Here |
 |
| Tutorial Here |
 |
| Tutorial Here |
 |
| Tutorial Here |
 |
| Tutorial Here |
Friday, September 30, 2011
Baby Shoes Tutorials
I've been working on making some little booties for Colby. He's not quite to the walking stage so he doesn't need real shoes and these will keep his feet warm when we take him for walks in the stroller. Many of the tutorials I ran across looked especially cute for little girls but I had a hard time finding some for baby boys. Here's a list of the best ones I found:
Shwinandswin@blogspot.com
homespun-threads.com
homespun-threads.com
stardustshoes.blogspot.com
HELLOmynameisHeather.typepad.com
Shwinandswin@blogspot.com
 | |
| Pic from here Tutorial here |
 | |
| Pic from here tutorial here |
 |
| Pic from here tutorial here |
 | |
| Pic from here tutorial here |
 |
| Pic from here tutorial here |
Monday, September 26, 2011
Sugared Pecans or Walnuts
Yum. That pretty much sums up this recipe. I'm hoping to revisit this recipe over the holiday season and share with my friends and family as gifts. The original recipe came from here. I found that adding more powdered sugar helped coat the nuts better.
Transfer the nuts to a bowl.
In another small bowl, combine the spices; sift over the nuts, stirring to coat evenly.
Let cool before serving.
Ingredients:
- 16 ounces pecans or walnut halves
- 1/2 cup melted unsalted butter
- 1 cup powdered sugar
- 1/4 teaspoon ground cloves
- 1 1/2 teaspoons ground cinnamon
- 1/4 teaspoon ground ginger
Preparation:
Turn slow cooker to HIGH about 15 minutes in advance. In hot slow cooker, stir together the nuts and butter. Add the powdered sugar, stirring to blend and coat evenly. Cover and cook on HIGH for 15 minutes. Reduce the heat to LOW and remove lid; cook, uncovered, stirring occasionally, for about 2 to 3 hours, or until the nuts are coated with a crisp glaze.Transfer the nuts to a bowl.
In another small bowl, combine the spices; sift over the nuts, stirring to coat evenly.
Let cool before serving.
Tuesday, June 7, 2011
Homemade Burp Cloths
Oh holy moly, I can't beleive how many burp cloths we go through. Not only do I use quite a few for baby urps, nursing, and just spills, but Kola our Golden Retriever will bring them to us whenever we leave them within her reach. I made it my goal to replicate some of the rags that my sister had given me-and mission complete.
I Started with some terry cloth from Jo Ann's (I got it 50% off with a coupon) it was about 7 dollars a yard which sounds expensive but I made about ten cloths out of half a yard. I also used some flannel that I had in the cupboard for the reverse side. Basically the cloths are made by cutting out two pieces of fabric in the size you want. I made an assortment of sizes and sew them together right sides together leaving a small gap to turn the right side out, and then stitch around the top of the cloth and you are done. Wholla, what a great easy cheap present for those expectant moms.
I Started with some terry cloth from Jo Ann's (I got it 50% off with a coupon) it was about 7 dollars a yard which sounds expensive but I made about ten cloths out of half a yard. I also used some flannel that I had in the cupboard for the reverse side. Basically the cloths are made by cutting out two pieces of fabric in the size you want. I made an assortment of sizes and sew them together right sides together leaving a small gap to turn the right side out, and then stitch around the top of the cloth and you are done. Wholla, what a great easy cheap present for those expectant moms.
Thursday, May 5, 2011
Letter Collage Wedding Present
Wow, I'm pretty excited about this project. When we went to the Craftstravaganza there was a booth that a lady had photographs of letters and then you could spell out whatever cheesy thing you wanted like BELIEVE, LOVE, etc. I stumbled upon this project on a few different blogs at Under the Table and Dreaming and Full of Great Ideas. I'm so excited because I've got a wedding to go to in a few weeks and I have a hard time coming up with heart felt gifts and not just things from gift registries. I suppose they really want the things from the gift registry, but they seem so impersonal. So I'll run down through with a quick tutorial.
Here's some examples from other places:
 | ||||
| Full of Great Ideas |
 |
| Full of Great Ideas |
 |
| Under the Table and Dreaming |
1. First you need to figure out what you want it to say. I used graph paper and started with a 9x9 or there are 16x16 options. So for mine I did SOUKUP 2011 since that will be their last name and their wedding year. So many options are out there you just have to play around with it.
2. Go to this flikr stream of photos of letters and numbers.
3. Choose a letter you want. Click on the photo you like and then at the top left hand corner there is a pull down tab that says actions. Click on it and choose view all sizes.
4. Choose to do the original size or the 1024x1024 for the best resolution. Next click on Download_________size of photo. Do this for all your letters and numbers.
5. Next go to Shutterfly.com and find the collage poster. It is under photogifts and then collage posters.
6. Choose the size and format you want. I went with 11x14 and 9 pictures.
7. Upload pictures to an album (you will need to start a shutterfly account) and then drop the pictures where you want them.
8. Order and wait. My order was 10 dollars which included shipping, a pretty good buy if you ask me.
9. Frame and gift.
Thursday, December 23, 2010
Cinnamon Rolls-Rhodes Style-Freezer to Oven
For those of you that are scared of making breads due to having to worry about yeast and all the time it takes to make-fear not-bread is very forgiving. The bread won't turn against you if you forget it for awhile. It won't mind if you take our your aggressions on it while kneading. Have no fear of bread.
Directions:
1. Find a cinnamon roll recipe and follow the recipe except once you have them formed and cut into rolls, put them on a greased pan and put them in the freezer instead of the oven.
2. Once rolls are frozen remove from pan and put in ziploc bag or container you plan on baking them in covered with plastic wrap.
3. The night before you want to bake them put them in a greased pan, cover with plastic wrap, and let sit out over night. In the morning place in the oven and enjoy once they are golden brown.
Variation on the rolls:
- Chewy Caramel Rolls: Sprinkle the bottom of the pan with brown sugar and pats of butter-the more the tastier.
- Gooey Caramel Rolls: Blend 1/2 Cup of vanilla ice cream, 1/2 cup of brown sugar, and 1/2 cup of white sugar and place in the bottom of the pan.
- Frosted Rolls: Mix up some cream cheese frosting (3 oz cream cheese, 2 cups powdered sugar, 1 tsp vanilla)
- Glazed Rolls: Mix 1 Cup of powdered sugar with a few tablespoons of milk or cream to reach a smooth consistency and drizzle over the rolls.
Tuesday, November 23, 2010
Divine Sweet Saltines
Ingredients:
40 Saltine Crackers (one tube of crackers + 10 or so)
2 Sticks of butter
1 Cup of Brown Sugar
1 1/3 Cups of Chocolate Chips (I mix in white chocolate chips too)
Directions:
1. Preheat oven to 425 degrees.
2. Butter up heavily or line a large cookie sheet with foil. I've had problems with the foil sticking before so I usually opt for lots of butter on the pan. Spread crackers out in single layer on cookie sheet.
3. In saucepan melt butter and sugar then boil for 5 minutes. Pour mixture over crackers and place in oven for 5 minutes or until bubbly.
4. Top with Chocolate chips and wait a few minutes for them to warm up then spread them with a spoon. Place in freezer or outside if you live in the Midwest in the winter time. Break into pieces and store in a cool spot.
5. Try not to eat the whole batch before you deliver them.
Friday, November 12, 2010
Christmas Present Idea* Little Comfy Pants

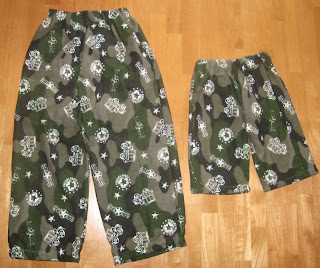
I think JoAnns will be the downfall of our checking account. Last time I was there I found this camouflage flannel for $2.99 a yard. Two of my nephews ages 4 and 1 have their dad serving over in the Middle East for a second tour with the army so I thought they would enjoy having Army-esque pants. Last time I was visiting them I simply traced a pair of their pants onto newspaper for a pattern. The little pants seemed out of proportion with a really long waist band, so I dropped the waist, only to realize later that he would need a longer waist to accommodate his bulky diaper. They may end up being low risers for him-so trendy:)
Price: $7.00 for fabric and elastic
Time: 30 minutes
Price: $7.00 for fabric and elastic
Time: 30 minutes
Friday, November 5, 2010
Homemade Dog Bones

When the time comes for Christmas gift giving, I have a hard time. One of my favorite gifts to give are these dog bones. The first time I gave the bones I put the bones in personalized containers. I used old oatmeal and hot chocolate cardboard tube containers. I made labels and included the cutest picture of my dog ever. My dog generally turns her nose up at store bought biscuits, but she gobbles these right up.
Cheesy Peanut Butter Dog Bones
1 cup of Oatmeal
1/4 cup of Margarine/butter
1.5 cups of hot water
1 cup of shredded cheese
1 beaten egg
1 cup of cornmeal
1 cup of wheat germ
3 cups of flour (white or wheat)
1 cup of peanut butter (creamy or chunky)
Directions:
1. In a large bowl pour hot water over oatmeal and margarine. Let stand 5 minutes.
2. Stir in peanut butter, cheese, egg, cornmeal, and wheat germ.
3. Add flour.
4. Knead by hand for 3-4 minutes.
5. Roll dough to 1/2 inch thick and cut into dog bone shapes, sticks, or use cookie cutter.
6. Place on greased cookie sheet and place in oven at 300 degrees for 30-45 minutes until golden brown.
7. Turn off oven, but leave bones in oven to continue baking. Cool and place in container.
8. Store bones in cool place or refrigerator.
Subscribe to:
Posts (Atom)


