Around our house we generally try to go green when we can. I'm sure I have a long way to go, but at least I'm making an effort. Growing up my mom wasn't too much of a "clean freak". The house was organized in its own cluttered way, but there were no ooey gooey messes around. Most of the cleaning was done with simple soap and warm water. These days there's starting to be a turn around from disinfecting everything to letting kids be around dirt to possibly help build up their immune systems-so I'll do what I can to keep a dirty house for my kid:)
General Cleaning Spray: Get a bottle and fill it with 4 parts water to 1 part vinegar. This will disinfect as it cleans and help eliminate odor. Use it around the sink, bathroom, on stains, carpet, and windows.
Scrubbing Solution: Use baking soda to scrub stuck on messes on dishes and counters.
Windows: Use the vinegar spray with newspapers or paper towels.
Garbage Disposal: After you use a lemon put the rind down the garbage disposal and run it. I usually use half or a quarter of a lemon.
Slow Draining Sink: Fill sink with hot water from tap all the way then release open drain. Do this a few times and it should work the soap and grime build up down the drain.
Stains on Kids Clothes or Diapers: Place in sun for a few hours up to a day. Most stubborn poop stains will be bleached out.
Stainless Steel Polish: Clean surface and dry with towel. Dribble some baby oil directly on surface or on soft cloth and rub all over. Lovely shine without the harsh chemicals.
Stinky Clothes: Soak clothes in washer with 1/2 to 1 cup of vinegar.
Oil Stain on Clothes: For this to work you have to do it right away. I've found it you put Dawn dishwashing detergent on your stain and rub it around and then wash it sometimes this will get out the stain.
Stuck on Gunk: Use boiling hot water to remove dried on chocolate and other gooey things from counters, plates, and dishes.

Thursday, June 30, 2011
Wednesday, June 29, 2011
Ice Cream Fudge Sauce Recipe
Yum. This recipe was passed down to me by my mom. I remember her making this thick gooey sauce on the stove top as a treat. Most ingredients can be found in the average person's pantry so it is a quick way to spice up some ice cream and delight your family. I found last night that both cans of my evaporated milk were expired and turned into some brown gross goop, so I replaced it with skim milk which made the sauce a bit thinner, but still delicious, it did thicken some after being cooled in the fridge over night though.


Ingredients:
3/4 Cup of Sugar
1/2 Cup of baking cocoa
1 Can of evaporated milk (5 oz.)
1/3 Cup of corn syrup
1/3 Cup of butter
1 Teaspoon of Vanilla
Directions: In a saucepan bring sugar, syrup, cocoa, and milk to boil stirring constantly. Boil for 1 minute stirring constantly. Take off heat and stir in butter and vanilla. Enjoy with ice cream, brownies, or any other delectable goodness you can come up with. Yum.
Tuesday, June 28, 2011
Grilled Asparagus
This recipe is a go to for when we have company over. I like to do this just straight on the grill but it works with the broiler as well or in a skillet.


Ingredients:
1 bundle of fresh Asparagus
Olive Oil or Spray Canola
Salt and Pepper or Lemon Pepper
Directions: Snap the ends off of the asparagus. Generally I pick one piece up at a time and bend the last 3-4 inches and then the hard chewy end of the asparagus will pop off. Place asparagus on plate or cookie sheet if you are doing it in the oven. Drizzle with olive oil or spray with Canola/Pam. Sprinkle asparagus with salt and pepper or Lemon pepper. Place in/on hot grill or oven. Turn after about 5 minutes, after another five minutes it should be good. If you turn the asparagus too frequently it won't crisp up. Enjoy.
Monday, June 27, 2011
Citrus Garlic Ginger Chicken Marinade
Since it is finally summer here in Minnesota my husband and I have been using our gas grill several times a week. This recipe I came across and tweeked it to fit what I had in my fridge. It is best to let the chicken marinade overnight to get more flavor but in a pinch it can be just marinaded an hour. As long as you get the main ingredients you can add more or less of the juices to make it work for how much chicken you have.

Chicken Breasts
Juice of one orange (1/4 cup of OJ or OJ concentrate-watered down)
Juice of one lemon (1/4 cup of lemon juice from bottle)
1-2 Tablespoons of diced ginger (Whole ginger is found by lettuces in grocery stores)
2-3 Cloves of Garlic minced
water or 7-up to cover chicken
Directions:
Put everything in ziploc bag or container-mix. Add chicken and refridgerate over night. Grill.
Tuesday, June 21, 2011
Peonies-gardening
My plants are finally coming up in my veggie garden. I've got a good crop of lettuce, carrots, beets, corn and gobs of tomatoes and peppers. My peas and beans aren't flourishing but they were attacked and laid on by Kola my 90 pound golden retriever. This weekend I managed to spend over fifty dollars on flowers and shrubs at the Cub food greenhouse because they were having an end of the year sale. The cash register said it wasn't bad considering I bought a pee-onnnn-eeee. She said it in the most peculiar way that it has stuck with me. I much prefer her pronunciation though because the way I say it makes it sound like an ugly flower. I'm eagerly awaiting for it to blossom.


Friday, June 17, 2011
Whole Wheat Pizza Dough Recipe
Lately I've been trying to eat healthier and to my husband's chagrin I have been experimenting with adding whole wheat flower to my baked goods. Whole wheat waffles did not pass the test, but this whole wheat pizza crust is one of his favorites. To add whole wheat appropriately you can't just substitute it for all the white flour you should probably start with replacing just 1/2 cup to 1 cup of the flour at a time for whole wheat flour.
Ingredients:
1 Tablespoon of Yeast
1 Cup of warm water
2 Tablespoons of veggie oil
1 teaspoon of sugar or honey
Dash of Salt
1 1/2 Cups of Flour (up to 1/2 cup more)
1 Cup of Whole Wheat Flour
Corn Meal
Toppings (Fresh tomatoes, pesto, onion, green pepper, chicken, cheese, garlic, etc)
Directions:
1. In a large bowl dissolve yeast in water. Add in oil, sugar, salt, and 1 1/2 cups of white flour. Mix until smooth. Add in whole wheat flour and extra flour until the dough isn't very sticky.
2. Dump dough on floured counter and turn/knead into a ball. Cover and Let rest 10 minutes.
3. Roll dough out on floured surface. I usually make 2 really thin crusts about 10x12 inches. Once rolled out place on cookie sheet that has been sprinkled with cornmeal.
4. Bake at 425 degrees for ten minutes.
5. Take pizza out and top, place back in oven for 8-10 minutes until cheese and toppings are adequately gooey.
Thursday, June 16, 2011
Wall Art
Well, once again I had the modge podge out yesterday so I decided to try my hand at making my own canvases. As a first go, it wasn't too bad, but the finish product is a bit rough. In the blogosphere-I really don't like that word, but I'll use it anyways-I read about using shoe box lids for wall art. I basically modgepodged over the lids with newspaper and then applied a picture from a Mother Goose book. I think it may be cool just to paint over the lids in the future.


Wednesday, June 15, 2011
How to Make a Nightlight Cover

Alrighty, so when Colby was finally able to stay in his crib in his own room I had to go shopping for nightlights. I was highly dissappointed at the options and cost of "pretty" nightlights available. I ended up getting a twelve dollar frog nightlight and we had one with a regular shade in the bathroom, I decided it was time to dress up the regular one today. It turned out alright, but I think I may give it another go later.
1. Start with a nightlight and soap box.


2. Cut box to reinforce sides. Using masking tape tape around box for extra stability if desired, and measure from previous shade where you need to cut out the bottom.


3. Modge podge around box with newspaper.

Tuesday, June 14, 2011
Eczema-let the lotions begin
Yesterday we took our little boy Colby to the dermatologist because he has been having chronically dry red patches on his skin and cracking in his fat creases and ankles. The Dr. didn't even look at Colby closely and diagnosed him with having Atopic Dermatitis AKA eczema. He prescribed some steroids and recommended some expensive over the counter soap and lotion. I probably should mention that this dermatologist has been spotlighted in numerous magazines and won many awards, so he must know what he's doing...He said to bathe Colby 1-2 times daily-which I hadn't been doing because I thought it would dry him out more, and apply Cerave twice a day. I asked how long we'd have to do it and the nurse said until Colby can do it himself, but hopefully he'll out grow it in a few years.
 This cream looks pretty generic but it runs for over $14 a jar-but it works fabulously. Apparently it repairs the skin while moisturizing. I've been using it on my hands and face some and I'm feeling pretty soft. I would recommend this lotion for anyone with dry skin.
Monday, June 13, 2011
How to Make Diapers Out of T-shirts...
Yes, I know, another diaper post, but that is what I find myself mainly making. This time I'm going to attempt to upload the pattern that I use. I had this old t-shirt that I have been holding onto because I love the design, but with numerous stains I couldn't wear it out of the house, so not it will be a poo catcher:)

1. Start with a t-shirt.
2. Cut out 2 pattern pieces.
3. Cut out soaker pad out of old towels-I do two layers.
4. Sew soaker pad to one piece of t-shirt on the wrong side (not the design side)
5. Sew both pieces of diaper together right sides together-leaving a few inch gap to turn right side out.
6. Turn right side out.
7. Top Stitch around edges making sure to go all the way around.
8. Pin on baby.
Here's the Pattern


Friday, June 10, 2011
Conquering the Mighty Pineapple- How to Cut a Pineapple

Pineapples for a long time intimidated me-such a pokey fortress how in the world could I get inside to the tasty fruity flesh-then I gave it a whirl. Yum.
1. Buy a pineapple. I look for one that doesn't looks solid with no soft spots. Rarely have I had a bad pineapple.

2. Using a sharp knife cut the top off.

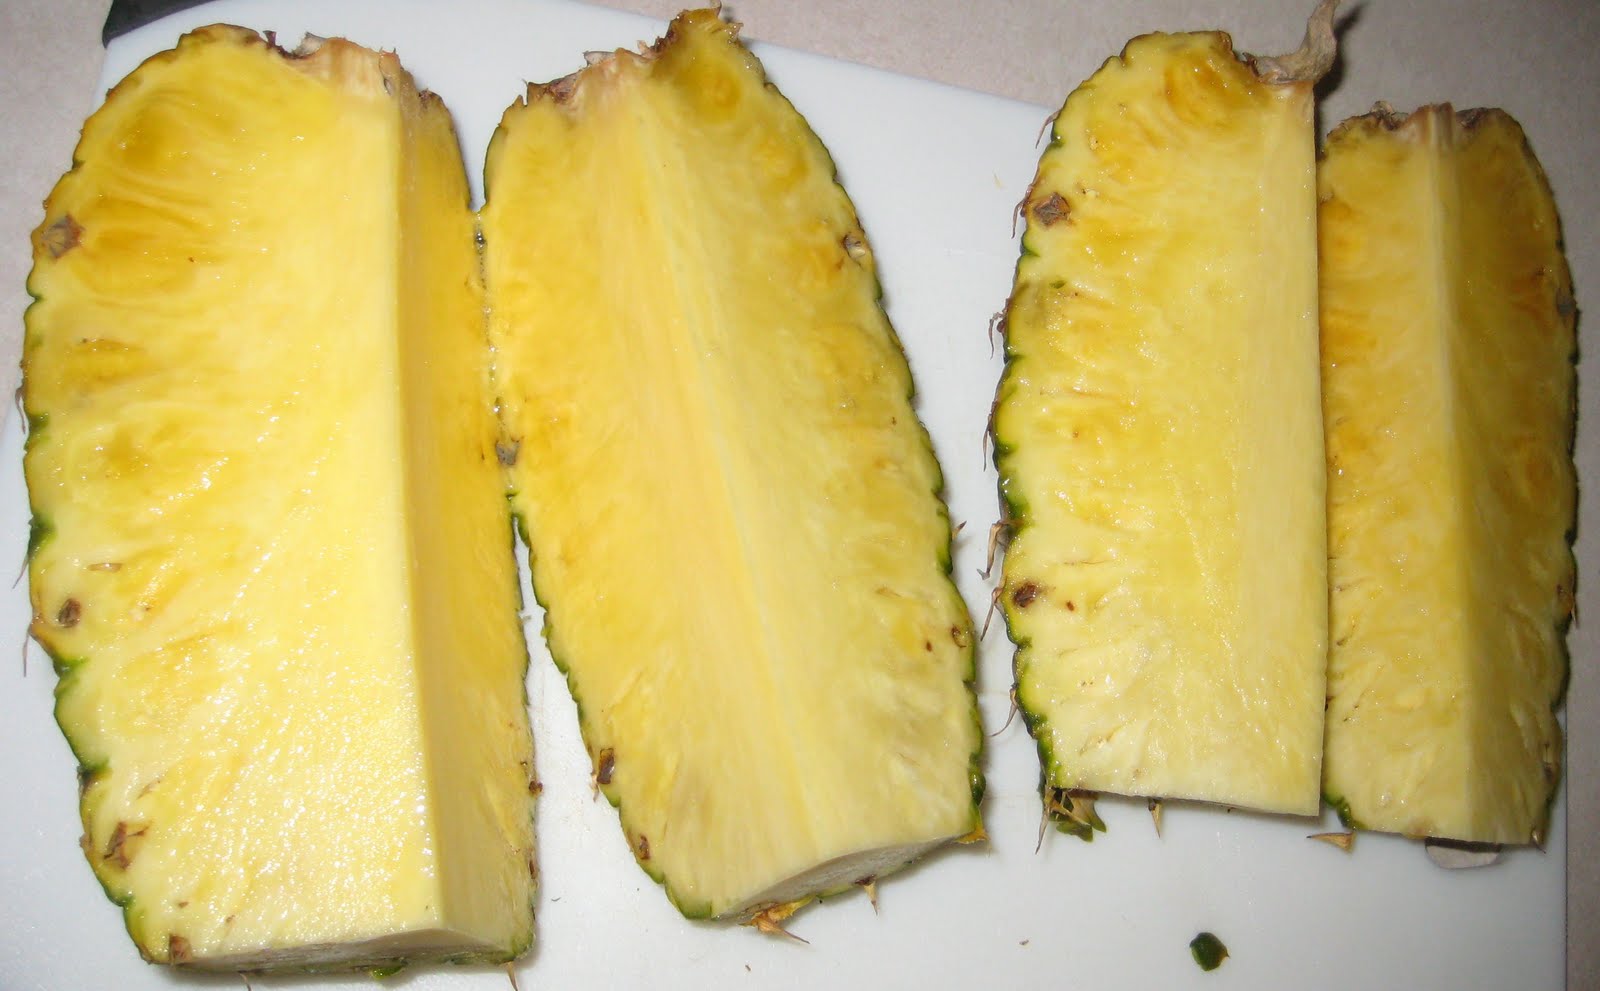

5. Cut along the skin-try not to cut too much off or you'll end up with barbs in your pineapple chunks.


7. See post about growing your own pineapple from the top!
Thursday, June 9, 2011
Chili Recipe
I believe the phrase for the weather in Iowa was if you don't like it wait five minutes and it will change, apparently the same rings true for Minnesota, we were ranging in the 100's two days ago and we are now in the 60's-so out came the chili. This recipe is one that has just evolved and changes each time I make it. This chili is s thick hearty veggie laden stew that is great on a chilly (ha) day and it is easy to make. (On a side note it is really hard to photograph chili without making it look like throw up)

Ingredients:
1 Pound of Ground Beef (85-90% Lean is fine)
1 Onion Diced
4 Cloves of Garlic Minced
4 Carrots Chopped
2 Stocks of Celery Chopped
1 Can of Stewed or Diced Tomatoes
1 Can of Chili beans in Sauce
Handful of Cherry Tomatoes Halved
3 Tablespoons of Chili Powder
1/2 Tablespoon of Basil
1/2 Tablespoon of Parsley
Directions: In large pot brown meat with onion, garlic, carrot, and celery. Once meat is browned add the rest of ingredients and let simmer until heated through or until you are ready to eat. Eat and Enjoy.
Wednesday, June 8, 2011
Homemade Diapers


Tuesday, June 7, 2011
Homemade Burp Cloths

I Started with some terry cloth from Jo Ann's (I got it 50% off with a coupon) it was about 7 dollars a yard which sounds expensive but I made about ten cloths out of half a yard. I also used some flannel that I had in the cupboard for the reverse side. Basically the cloths are made by cutting out two pieces of fabric in the size you want. I made an assortment of sizes and sew them together right sides together leaving a small gap to turn the right side out, and then stitch around the top of the cloth and you are done. Wholla, what a great easy cheap present for those expectant moms.


Monday, June 6, 2011
How to Coupon
Sorry for the lack of posting this past week, my in laws came up on Thursday-Sunday and my husband and I also had to go to a recognition dinner for one of his projects he was working on at a fancy Italian Restaurant, which was very tasty. While at this function I started talking with one of his coworkers who started a small project on the side of work called Get Your Gear. These are basically index cards with pictures and lists of everything a child would need for a sport, or school. She mentioned that she just got called from Better Homes and Gardens and may be featured there. You can check out these cards at SimplyOrdered.com or just follow this link.

Aside from doing personal organizing she is also an avid couponer, so I took the opportunity to get some pointers:
1. Buy before you need it. Everything runs on a six month cycle so buy the sauce, deodorant, diapers before you need them.
2. Shop around. Different stores offer different deals so to get the best price you may need to visit a few different stores.
3. Rainbow food doubles manufacturer coupons on Wednesdays and Fridays-enough said.
4. Keep the circulars you get in the mail (SmartSource, RedPlum, P&G etc) label the front with SS, RP, PG and the date-these will come in handy for #5.
5. Go to pocketyourdollars.com and this blogger lists what the best deals are for each store by combining manufacturer coupons with in store deals. It is pretty awesome. She lists what the best deals are for Cubs, Walgreens, CVS, Rainbow, Target, and Walmart.
Wednesday, June 1, 2011
New Garden!
One of the most delightful things about a garden is the anticipation it provides. ~W.E. Johns, The Passing Show


Colby and I finally got the garden in today and I'm so excited to watch it all grow. I planted corn, beans, peas, beets, carrots, zucchini, yellow squash, pumpkins, peppers, and tomatoes. Apparently the soil is very sandy up here in Minnesota so hopefully everything will grow for me. The dog has discovered that she can enter through the back side of the garden, but hopefully she will forget about it and be intimidated by the little yellow and red flags so she won't destroy the garden.

I absolutely loved the last few days digging in the dirt and grime-it made me feel more connected and grounded. I picked so many worms out of the newly turned sod I can't count them, but hopefully they will return the favor of my saving them with a bountiful harvest. Only time will tell if I will have a vegetable garden or a weedy patch. I can't wait!
Subscribe to:
Posts (Atom)